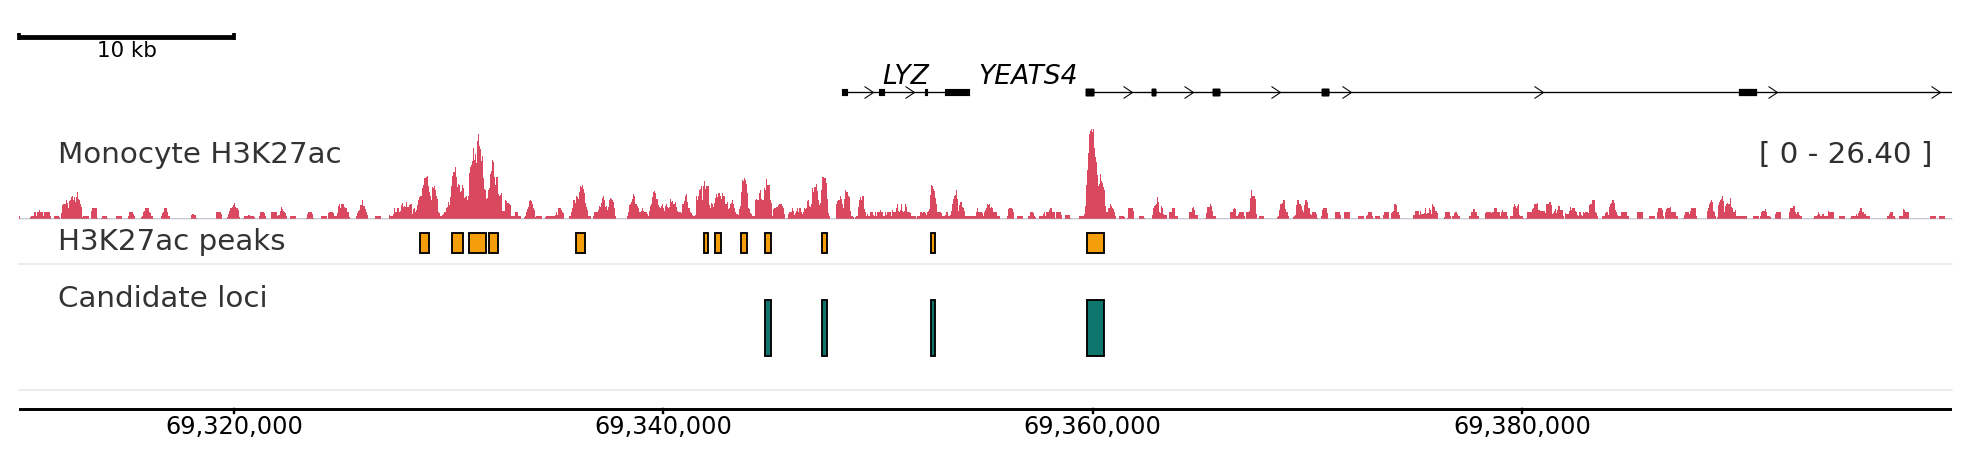
PlotNado
Genome browser figures without the browser
Publication-ready genomic tracks in Python.
PlotNado composes BigWig signals, genes, peaks, interactions, and overlays into clean genome-browser style figures with a high-level API and a file-driven CLI.
A composed PlotNado figure with signal, annotation, and structural tracks.
Pick your entry point
Most readers need one of three routes: get a figure rendered quickly, understand which track type to use, or tune the figure until it is publication-ready.
Start Here
Install and render your first figure
Use the Quick Start when you want a working figure with minimal setup and clear defaults.
Build With Confidence
Choose the right track and input model
Learn which track to reach for, what each one expects, and where to find concrete examples.
Tune The Result
Dial in styling, scaling, and layout
Use the aesthetics and recipes guides when the figure works but does not yet communicate clearly.
Two workflows, one rendering model
PlotNado offers a fluent Python API for notebooks and pipelines, plus a CLI that turns genomic inputs into editable YAML templates.
Python API
Compose tracks directly in code
Add tracks one method at a time and save the result in a single region-specific render step.
from plotnado import GenomicFigure
fig = GenomicFigure(theme="publication")
fig.scalebar()
fig.axis()
fig.genes("hg38")
fig.bigwig("signal.bw", title="ChIP signal", style="fill")
fig.save("output.png", region="chr1:1,010,000-1,080,000")
CLI + YAML
Infer a template, then edit and render it
This route is useful when the inputs already exist on disk and you want a reproducible, file-driven workflow.
plotnado init *.bw peaks.narrowpeak --auto --output template.yaml
plotnado validate template.yaml
plotnado plot template.yaml --region chr1:1,000,000-1,100,000 --output out.png
Need Options Fast?
Inspect the runtime metadata
Every track exposes discoverable options, so you do not have to guess field names or dig through source first.
from plotnado import GenomicFigure
GenomicFigure.track_options("overlay")
GenomicFigure.track_options_markdown("bigwig")
Rendered examples
The docs include plotted outputs, not just code snippets, so you can see what each configuration actually produces.
First figure
Start from a minimal stack: scale bar, axis, genes, and one signal track.
Overlay + autoscale
Overlay multiple signals in one panel while keeping y-scaling explicit and readable.
Theme-driven polish
Refine color, labels, and spacing once the track composition is correct.
Where to go next
If the figure is blank or scaling looks wrong, go straight to Troubleshooting. If you are deciding between track types, start with the Track Catalog. If you want exact parameters, jump to Reference and API Reference.